
Adobe Nav for iPad

As wonderful as Adobe Photoshop is, I doubt there is a person that would call it simple.. There are many ways to do just about anything, from choosing which tool to use, find that skin smoothing action and even managing your workflow. One of the quickest ways to speed up your workflow is to learn, and remember, a multitude of shortcut keys. B for Brush, Cmd (or Ctrl) J to duplicate a layer etc.. That is great for those that can hold all the different keystrokes in their grey matter, but for us mere mortals there are many more shortcuts that we forget than we remember.
There is a solution at hand for those with an iPad tablet. It is simple, quick and can be customised to your requirements. Welcome Adobe Nav, the Adobe App for accessing tools, shortcuts, actions and more without having to remember all those confusing keystrokes (anyone use the claw > Shift, Alt, Cmd E?). With Adobe Nav, you can set up a custom button instead!
At this time, Adobe Nav only exists for the iPad and not for Android
First Steps..
Download and install Adobe Nav from the iTunes store
From here it is the simple task of connecting Adobe Nav to Photoshop (CS5 or greater).. Have both your computer and your iPad connected to the same network and then in Adobe Nav click the PS button in the bottom right of the screen.

then click the New button to create a new connection to Photoshop.. this will bring up the following dialog box on the iPad

At this point we need to go back to Photoshop on the computer to get the IP address and to set a password

In Photoshop, go to the Edit menu and choose Remote Connections
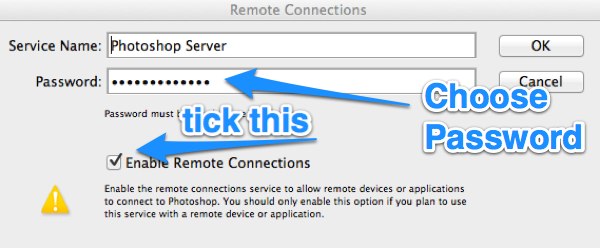
at the bottom of this dialog box there is an IP address.. Type the IP address and the Password into the iPad dialog box and select Auto Connect.
You should now have a connection between Photoshop and Adobe Nav on the iPad.. Congratulations!
Ok, so lets get started using the App in its default state..
Looks quite busy doesn’t it.. but it is pretty simple, especially if you know the basics of Photoshop.
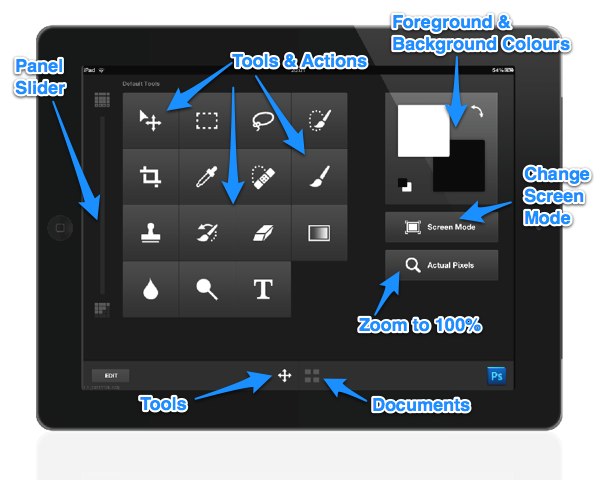
Below, I break down the various a parts of the user interface.
1) Panel Slider: scrolling up and down this slider allows you to choose between various presets for the Tools and Action section.
2) Tools and Actions: Here you can select a tool or even run an action and then the corresponding tool or action will be selected in Photoshop.. no more having to remember shortcuts or dig through menus to find what you want
3) Foreground and background colours: a quick and easy way to change your colours
4) Screen Mode: Quickly cycle through the various screen modes including lights out mode
5) Actual Pixels: Zoom into 100% to pixel peep
6) Tools & Documents: Switch between the Tools screen and the Documents screen
You can even create your own custom tools sets with all your favourite tools & actions..

As shown above, pressing and holding on the Panel Slider brings up a menu for customising your own tool sets.
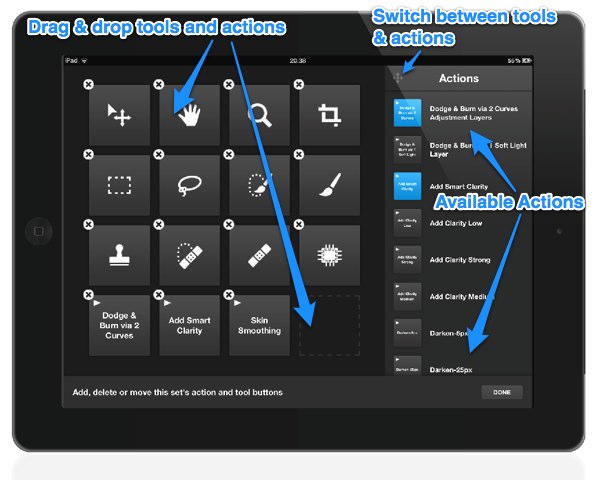
It is as simple as dragging the actions or tools from the right hand panel into the left panel. To switch between available actions and available tools touch the icon next to the Action/Tools name (see above)
Click done when you have completed adding your shortcuts.. and you now have a custom set ready for use.

and clicking an action button on the iPad causes that action to be run in Photoshop. no need to search the actions panel in Photoshop, or to remember strange key combinations.. just press one button.

I’m sure you can see the time savings, esp if you have lots of actions and spend ages looking for them.
Another way that Adobe Nav can speed up you workflow is in the Documents Panel.

The documents panel shows you what files are currently open in Photoshop, and simply touching one of the images on the iPad will make that image the active document in Photoshop. no more searching the tabs along the top of the Photoshop screen, now you can see which file you want and touch it!
You can even create a new document via the iPad or open a new document in Photoshop with an image or screenshot from your iPad. No need to transfer files, the app handles it all for you.
I can imagine for some, this app will not appeal but I’ve used it now for a little while and I find it makes life much simpler & quicker. I spend less time trying to remember and more time actually doing. give it a whirl and let me know what you think below.
Cheers
Scot
NB! I would like to offer a big thank you to fellow Nut Howard Pinsky for the Macbook Pro & iPad PSD files used in this tutorial


Somebody at Adobe was paying attention. They have needed this for a long while.
Great review Scot. The other reason I love this app, not only does document panel show you what files are open and allow easy switching, it caches full screen (ipad) previews of your open files directly to the ipad. Even if you then break the connection between your computer and the ipad, they remain in Adobe Nav. You can then take your ipad out to clients to let them review their images. It’s far easier than carrying a laptop and feels more interactive.
Looks useful. Hurry up with an Android version Adobe!
Great aticle! I sure will download this app. With warm regards, Ruud.