
Make a Photoshop Snowman and Grab a Free Snowflake Brush Set
 Christmas time…!
I’d like to show you how to make a simple vector style snowman in Photoshop.
Step 1.
 Make a new document 1024×768, set the foreground colour to #605ca8 and the background colour to #0254a6. Make a linear gradient from top to bottom and fill the screen with a nice shade of blue.
Step 2.

Select the Ellipse tool – set the options to shape layer and foreground colour to white. Make 3 circles, each one slightly smaller than the next. Stack them on top of each other as in the picture.
Step 3.

Next we make the hat, change the foreground colour to black, select the Rounded Rectangle Tool and make a vertical shape, switch to the rectangle shape and create the rim of the hat. Select both of the new Layers in the Layer Palette and drag them on top of the snowman’s head.
Step 4.

Change the foreground colour to Orange and then select the Pen Tool. Make a triangle for his nose.
Step 5.

Once again change the foreground colour to black, select the Ellipse Tool again and make and eye and mouth.
Step 6.

With the Ellipse Tool still selected make a squashed circle under the snowman as a shadow, reduce the opacity to 30%.
Step 7.

Change the Foreground Colour to #00aeef, select the Pen Tool again. We need to make a bent rectangle that goes around the snowman’s neck. We do this by making a rectangle with the Pen Tool and then adding two anchor points halfway down the rectangle, using the Pen Tool to drag the anchors down. Move the edge anchors so they fit around the snowman’s neck. Next add two smaller triangles coming from the rectangle we just created.
Step 8.

Change the Foreground Colour to #603913 (Brown) and with the pen tool make an arm and fingers.
Step 9.

Select all the layers that were made making the arm and put them into a group (Layer>Group Layer). Duplicate the Group by dragging it to the New Layer Icon, move the group under the snowman.
Step 10.
Change to the Text Tool, select Badaboom (or download it and install it from DA Front (http://www.dafont.com/badaboom-bb.font) in Black write Happy. Move the Layer under the Snowman layers so the snowman is on top of the text.
Step 11.

Duplicate the Happy Text layer by dragging it to the New Layer Icon (or by pressing Control & J) right click on the Layer in the Layer Palette and select Rasterize Text. We now want to invert the colours of the duplicate Layer by pressing Control & I. Move the white text up and left slightly.
Step 12
 .
.
Do the same as step 11 but write Xmas.
Step 13.

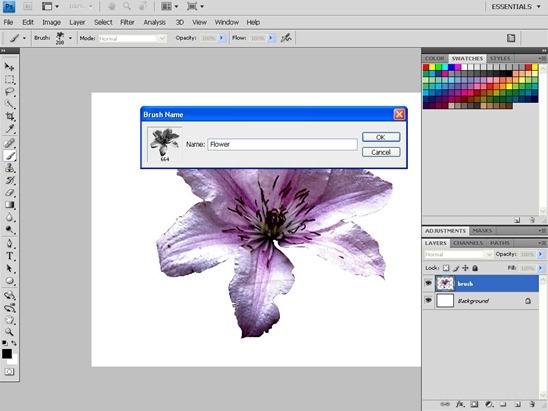
Finally download a snowbrush I made from http://rev-jesse-c-stock.deviantart.com/gallery/2871855#/d13avtz. Set the foreground Colour to white and on a new layer add some different snowflakes. The Scatter brushes are better for random sizes 😀
Hope you enjoyed this tutorial and have a good Christmas/ holidays and new year 😀


Leave a comment